Mastering Hierarchy Charts in Microsoft Phrase: A Complete Information
Associated Articles: Mastering Hierarchy Charts in Microsoft Phrase: A Complete Information
Introduction
With enthusiasm, let’s navigate by way of the intriguing matter associated to Mastering Hierarchy Charts in Microsoft Phrase: A Complete Information. Let’s weave fascinating info and supply recent views to the readers.
Desk of Content material
Mastering Hierarchy Charts in Microsoft Phrase: A Complete Information

Hierarchy charts, also referred to as organizational charts, are visible representations of hierarchical relationships inside a system, group, or challenge. They clearly illustrate the reporting construction, ranges of authority, and the relationships between totally different elements. Whereas devoted software program provides superior options, Microsoft Phrase offers ample instruments to create efficient and visually interesting hierarchy charts, appropriate for a variety of purposes, from easy crew buildings to complicated challenge breakdowns. This complete information will stroll you thru the method, masking varied methods and providing suggestions for optimizing your chart’s readability and impression.
I. Selecting the Proper Methodology: SmartArt vs. Shapes
Microsoft Phrase provides two main strategies for creating hierarchy charts: SmartArt graphics and manually arranging shapes. Every strategy has its strengths and weaknesses, and your best option will depend on the complexity of your chart and your required stage of customization.
A. SmartArt Graphics: The Fast and Straightforward Possibility
SmartArt graphics supply a streamlined strategy, ultimate for rapidly creating primary hierarchy charts. They supply pre-designed templates with varied layouts, permitting you to easily enter your textual content and regulate the formatting.
-
Accessing SmartArt: Navigate to the "Insert" tab on the Phrase ribbon and click on on "SmartArt."
-
Choosing a Hierarchy Template: Select from the "Hierarchy" class. A number of choices can be found, together with:
- Group Chart: A basic hierarchical construction with bins representing people or departments.
- Record: An easier, linear hierarchy appropriate for smaller buildings.
- Pyramid: Visually emphasizes the hierarchical ranges.
-
Including Textual content: As soon as you have chosen a template, merely click on on the textual content placeholders and enter your information.
-
Customization: SmartArt provides primary customization choices, permitting you to vary colours, fonts, and add pictures. Nevertheless, superior customization is proscribed.
B. Guide Association with Shapes: Most Management and Flexibility
For complicated charts requiring exact management over structure, fashion, and design components, manually arranging shapes provides higher flexibility. This technique includes inserting particular person shapes and connecting them utilizing strains or connectors.
-
Inserting Shapes: Go to the "Insert" tab and choose "Shapes." Select from varied shapes like rectangles, rounded rectangles, and even customized shapes to signify totally different components in your hierarchy.
-
Arranging Shapes: Place the shapes to replicate the hierarchical construction. Bigger shapes on the prime can signify increased ranges, whereas smaller shapes beneath signify subordinate components.
-
Connecting Shapes: Use the "Traces" or "Connectors" choices beneath "Shapes" to create visible connections between shapes. This clearly illustrates the reporting relationships.
-
Customization: Guide association permits for intensive customization. You’ll be able to regulate form sizes, colours, fill types, add textual content bins, and incorporate pictures for a extremely tailor-made chart.
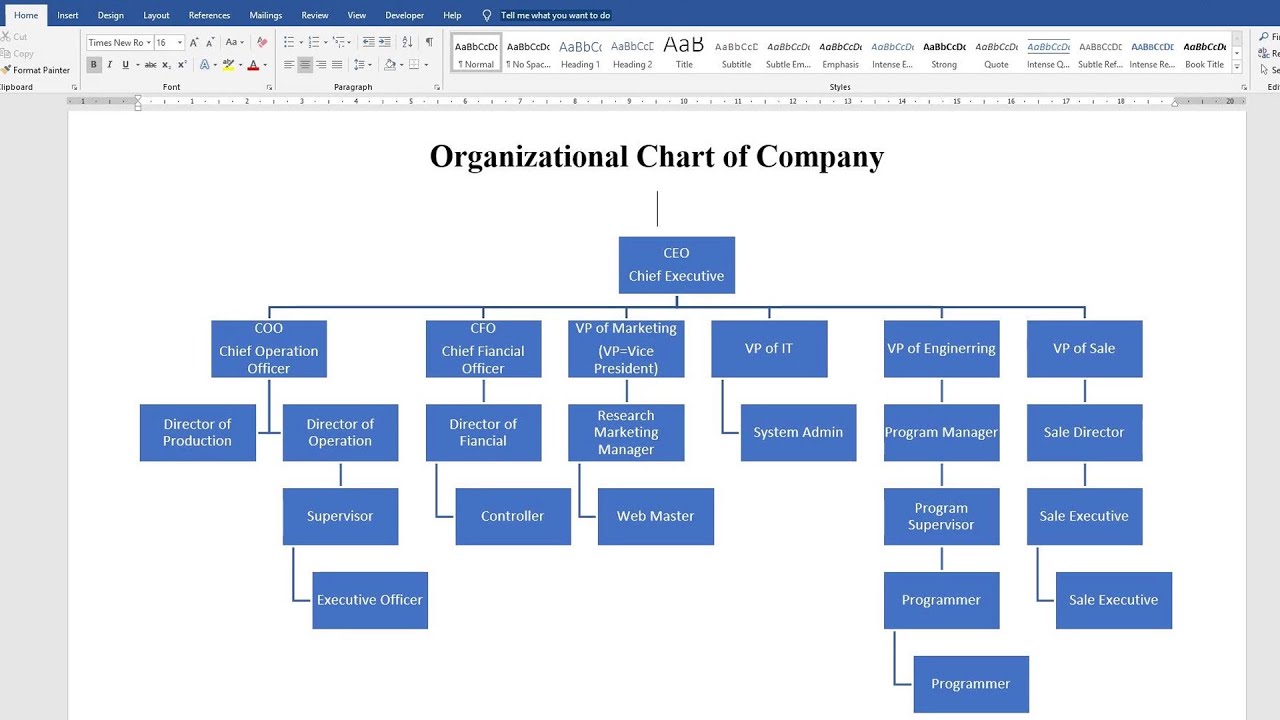
II. Making a Hierarchy Chart Utilizing SmartArt: A Step-by-Step Information
Let’s illustrate the method utilizing the SmartArt technique for a easy organizational chart:
-
Open a brand new Phrase doc.
-
Go to the "Insert" tab and click on "SmartArt."
-
Choose "Hierarchy" and select the "Group Chart" template.
-
Enter the next information into the textual content placeholders:
- Prime Stage: CEO (John Smith)
- Stage 2 (left): Advertising and marketing Director (Jane Doe)
- Stage 2 (proper): Gross sales Director (Peter Jones)
- Stage 3 (beneath Advertising and marketing): Advertising and marketing Supervisor (Alice Brown)
- Stage 3 (beneath Advertising and marketing): Social Media Supervisor (Bob Inexperienced)
- Stage 3 (beneath Gross sales): Gross sales Supervisor (Charlie White)
- Stage 3 (beneath Gross sales): Account Supervisor (David Black)
-
Customise the looks: Change the colours, fonts, and add pictures to every form if desired. You may also regulate the structure by dragging and dropping shapes.
-
Save your doc.
III. Making a Hierarchy Chart Utilizing Shapes: A Detailed Walkthrough
For a extra complicated chart requiring higher customization, let’s construct a challenge hierarchy utilizing shapes:
-
Open a brand new Phrase doc.
-
Insert shapes: Use rectangles for every challenge part. Measurement them proportionally to replicate their relative significance or period.
-
Label the shapes: Add textual content bins inside every form to label the challenge phases (e.g., "Venture Initiation," "Requirement Gathering," "Design," "Improvement," "Testing," "Deployment").
-
Create connections: Use straight connectors to hyperlink the phases chronologically. You’ll be able to regulate the connector color and style for higher visible enchantment.
-
Add sub-tasks: For every part, add smaller rectangles representing sub-tasks. Join these sub-tasks to their guardian part utilizing connectors.
-
Format the chart: Modify the form colours, fonts, and add pictures or icons to boost visible readability.
IV. Suggestions for Creating Efficient Hierarchy Charts
Whatever the technique you select, observe these tricks to create clear and efficient hierarchy charts:
-
Preserve it easy: Keep away from extreme element. Deal with the important thing components and relationships.
-
Use constant formatting: Keep constant font sizes, colours, and shapes all through the chart.
-
Label clearly: Use concise and descriptive labels for every ingredient.
-
Use visible cues: Make use of totally different colours, shapes, or sizes to tell apart between totally different ranges or departments.
-
Optimize spacing: Guarantee sufficient spacing between shapes to keep away from muddle.
-
Think about the viewers: Tailor the complexity and stage of element to your viewers’s understanding.
-
Proofread rigorously: Verify for spelling and grammatical errors.
-
Experiment with layouts: Strive totally different layouts and preparations to search out the best illustration of your hierarchy.
V. Superior Strategies and Issues
-
Utilizing Phrase’s Drawing Instruments: Discover Phrase’s drawing instruments for extra superior customization, resembling including shadows, 3D results, and different visible enhancements.
-
Incorporating Photographs: Use related pictures to signify departments or people, including a extra partaking visible ingredient.
-
Linking to Exterior Paperwork: For bigger, extra complicated hierarchies, contemplate linking components within the chart to separate paperwork containing detailed info.
-
Exporting and Sharing: As soon as accomplished, you possibly can export your chart as a PNG, JPG, or PDF for straightforward sharing and integration into different paperwork or shows.
By mastering these methods and making use of the following pointers, you possibly can create professional-looking hierarchy charts in Microsoft Phrase that successfully talk complicated info in a transparent and concise method. Bear in mind to decide on the strategy that most closely fits your wants and stage of experience, and at all times prioritize readability and visible enchantment to make sure your chart successfully conveys its meant message.
.jpg?auto=compress,formatu0026rect=0,173,1024,720u0026w=1024u0026h=720)


Closure
Thus, we hope this text has offered beneficial insights into Mastering Hierarchy Charts in Microsoft Phrase: A Complete Information. We hope you discover this text informative and helpful. See you in our subsequent article!